
Cleaning Kitchen After Celiac Diagnosis: The Total Reset Guide
A safe kitchen is the foundation of healing, but if you’re still in the ‘first 24 hours’ of your diagnosis, make sure you’ve handled the Emergency 5 Steps before you start scrubbing the baseboards.
You’ve made the transition. You bought the expensive gluten-free flour, you swapped your soy sauce for tamari, and you’ve spent hours researching safe brands. But if you are still using the same tools, pans, and appliances that you used before your diagnosis, you might be “micro-dosing” yourself with gluten every single day.
A Celiac diagnosis isn’t just about a change in diet; it’s about a change in environment.
To truly heal, your home must be a sanctuary. This requires a “Kitchen Reset.” If you live in a shared household where others still eat wheat, this process is even more critical. Here is how to handle cleaning your kitchen after a celiac diagnosis without losing your mind.
Why “Clean” Isn’t Good Enough
For a wheat allergy, a good scrub might suffice. For Celiac Disease, we are dealing with an autoimmune response triggered by microscopic proteins. These proteins are “sticky.” They love to hide in scratches, crevices, and porous materials.
If you use a scratched non-stick pan that once cooked wheat pancakes, those tiny scratches can hold onto enough gluten to keep your antibody levels high. To get healthy, you have to move through the three stages of a reset.
Stage 1: The Purge (What to Toss)
You don’t have to throw everything away, but you must be ruthless with porous materials. If a tool has “pores” or deep scratches, the gluten is now part of the tool.
- Wooden Tools: Spoons, rolling pins, and cutting boards are porous. They soak up gluten like a sponge. You cannot “sanitize” wood once it has touched wheat.
- Plastic & Silicone: Scratched plastic bowls and spatulas are high-risk. If they have visible wear and tear, replace them with stainless steel or glass.
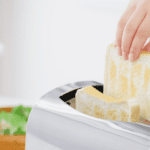
- The Toaster: This is non-negotiable. You cannot clean a toaster. The crumb tray is a gluten-particle accelerator. Buy a new one and label it “GF ONLY.”
- The Colander/Strainer: Gluten “paste” from pasta hides in those tiny holes. Buy a dedicated gluten-free colander.
Stage 2: The Deep Clean (The “Dust Zones”)
Gluten isn’t just in your food; it’s in the dust. Flour can stay airborne for hours and settle in places you never think to clean.
- The Pantry Reset: Take everything out. Vacuum the corners. Flour dust loves to settle in the back of shelves.
- The Silverware Drawer: Crumbs often fall into the cracks of the organizer. Wash the organizer and every piece of cutlery.
- The Convection Oven/Air Fryer: These appliances use fans to circulate air. If you’ve baked wheat bread or air-fried breaded chicken, gluten particles are now coating the heating elements and fans. If you can’t deep-clean the fan, you need a dedicated GF air fryer.
Stage 3: The Zone Setup (Shared Kitchen Rules)
If your family still eats gluten, you need boundaries. Cross-contamination happens most often during the “rush” of making dinner.
- Designated Shelves: Keep your gluten-free items on the top shelf. Why? Because if a bag of regular flour or a box of wheat crackers leaks from a lower shelf, it won’t fall onto your safe food.
- Color-Coding: Use a specific color (like green) for all your GF tools. If the family knows the “Green Spatula” is for Mom/Dad only, mistakes are less likely to happen.
- Counter Space: Use a dedicated “GF Prep Zone.” If you don’t have the space, use a large glass cutting board as your “safe island” that never touches wheat.
Stop the Guesswork and Start Healing
Cleaning your kitchen is the first step toward a pain-free life, but a single missed detail—like a scratched pan or a shared sponge—can keep your antibody levels high and your gut from healing. You shouldn’t have to play a guessing game with your health or spend your weekend arguing with your family about cross-contamination rules.
I’ve turned this overwhelming “reset” into a simple, visual system that takes the stress out of your home.
Inside the Controlled Home System, you’ll get:
- The Kitchen Reset Infographic: A “Keep vs. Toss” checklist you can print and take into your kitchen right now.
- The Shared Household Blueprint: My proven system for running a “mixed” kitchen without the constant fear of accidental exposure.
- The Safe Swap Guide: Exactly what to buy to replace your “Crumb Traps” without overspending.


Leave a Reply